TradingView allows traders to create custom PineScripts, indicator-based strategies, and alert conditions, but executing these alerts manually can be inefficient. With TradingView Signal Bots, you can automate trade execution based on your TradingView alerts—whether they are triggered by built-in indicators, custom scripts, or advanced strategies. These bots can operate in live mode, executing real trades on your exchange account, or in demo mode, where trades are simulated using virtual funds for strategy refinement. In this step-by-step guide, we’ll walk through how to set up automated TradingView alerts and connect them to a trading bot for seamless execution.
Overview
TradingView Signal Bots allow you to automate trade execution based on any TradingView indicator, strategy, or custom PineScript. Instead of manually placing trades when an alert triggers, your bot will handle everything in real-time. Here’s how the process works:
- Create a TradingView Signal Bot – Set up a bot in CryptoTailor to receive alerts (buy/sell signals from TradingView indicator or strategy).
- Configure TradingView Alerts – Connect TradingView signals to the bot.
- Bot Receives Alerts – When an alert triggers, TradingView sends it to your bot.
- Trade Execution – The bot processes the signal and places a trade automatically 24/7.
- Risk Management (Optional) – Set take profit, stop loss, or trailing stop loss.
- Live or Demo Mode – Run the bot with real money or test in a risk-free environment.
Step-by-Step Guide to Creating a TradingView Signal Bot
To get started, go to your account dashboard and navigate to TradingView Signal Bots > Create Signal Bot from the left menu. You can create the bot in 3 simple steps:

Step 1: Choose Exchange & Pair
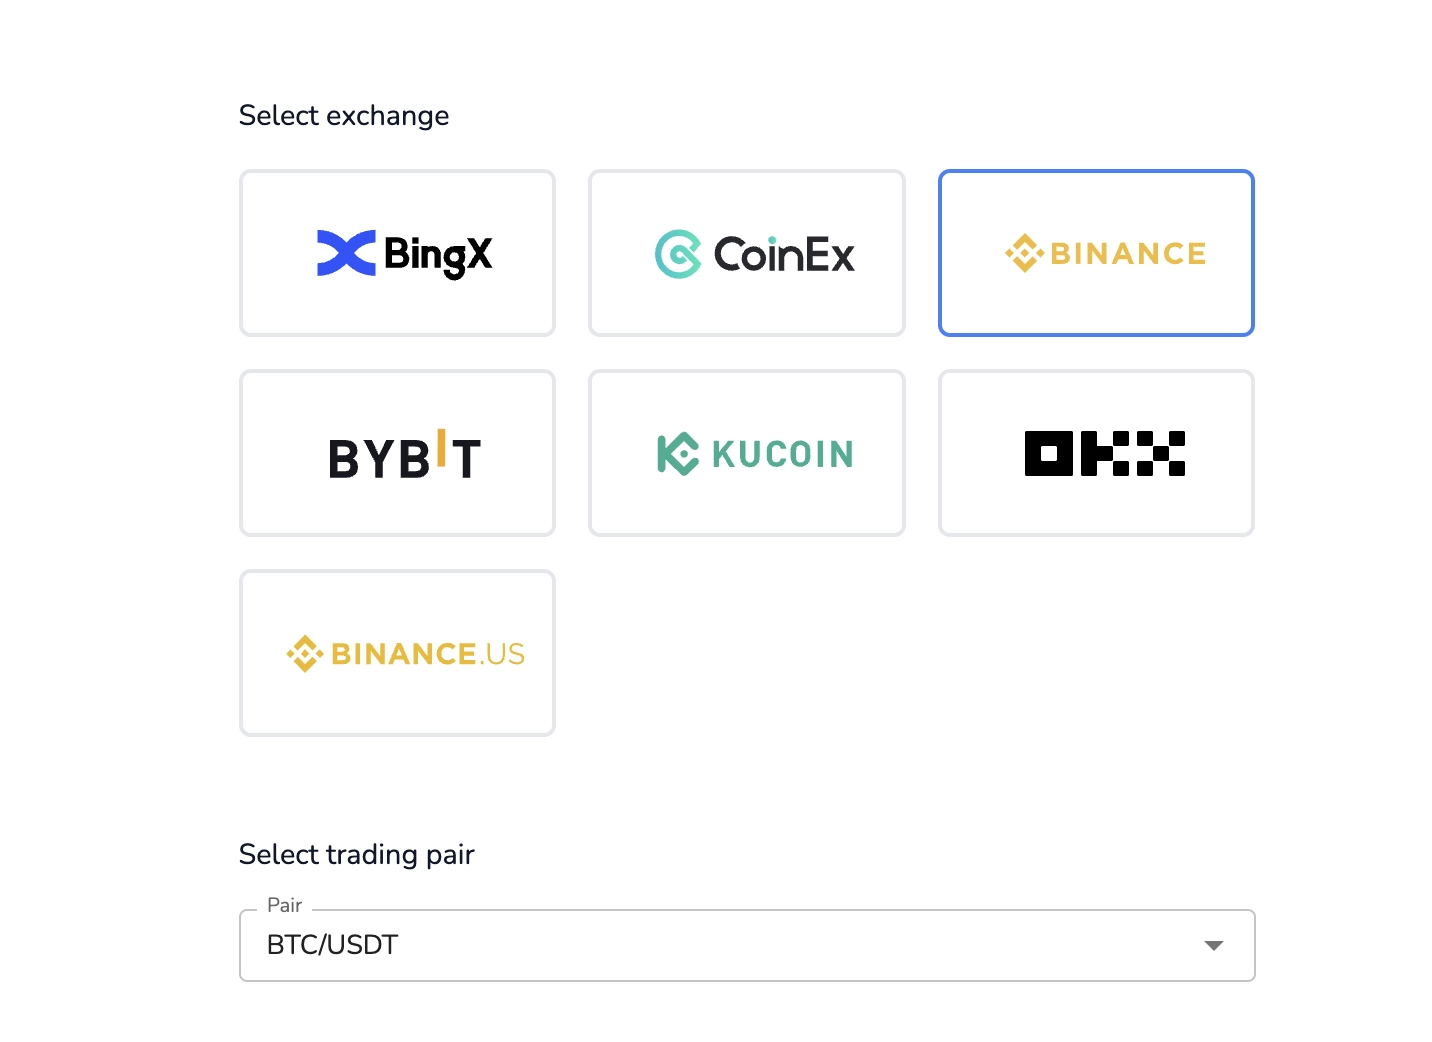
In the first step, simply select the exchange you want to trade on and choose a trading pair. For this example, we’ll use Binance and BTC/USDT.
Step 2: Capital Investment & Risk Management
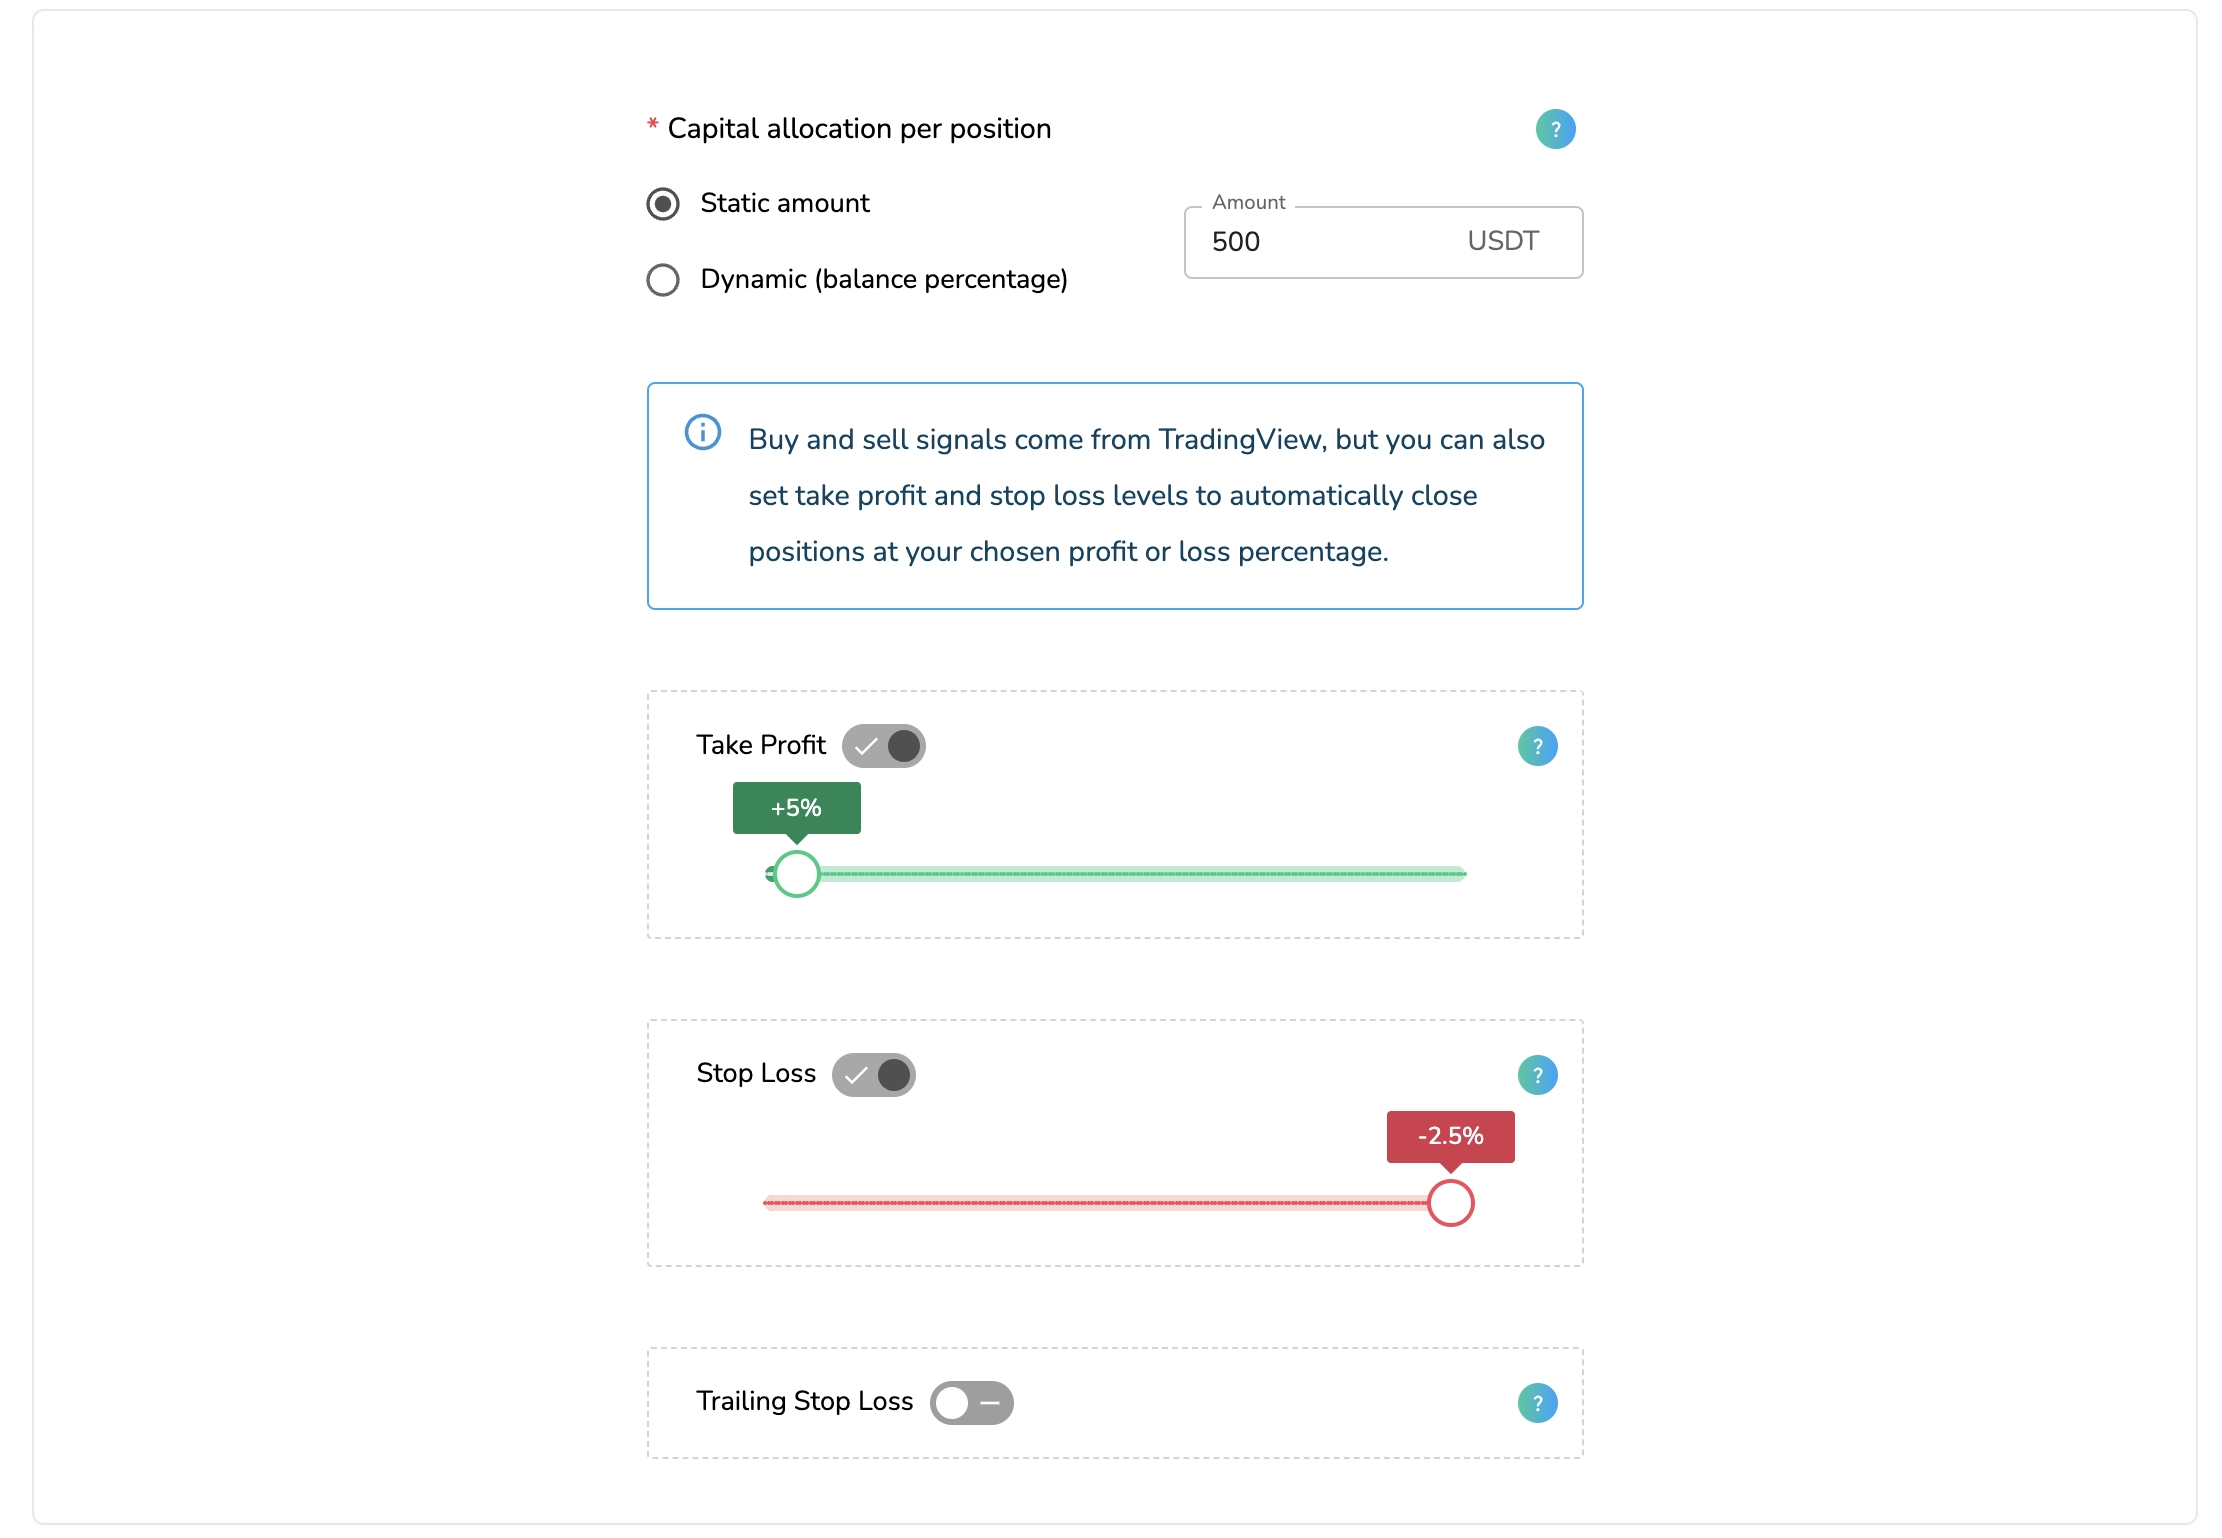
In this step, you'll define how much capital the bot should allocate per trade and configure risk management settings such as take profit and stop loss levels. Proper risk management helps protect your funds and optimize your trading strategy.
Choose Capital Allocation
- Static Amount → Set a fixed amount per trade (e.g., 500 USDT).
- Dynamic (Balance Percentage) → Allocate a percentage of your available balance.
Set Take Profit & Stop Loss (Optional)
Your bot can automatically close positions at a profit or loss based on your predefined percentages. The values shown here are just examples, and you can customize them based on your strategy:
- Take Profit → Close the position when it reaches a +5% profit.
- Stop Loss → Limit losses by closing at -2.5% from the entry price.
- Trailing Stop Loss → Adjusts the stop loss dynamically as the price moves in your favor.
💡 Buy and sell signals come from TradingView, but these settings allow you to control when positions close, ensuring better risk management.
Once you've set these preferences, you're ready for the final step: activating your bot! 🚀
Step 3: Activate the Bot
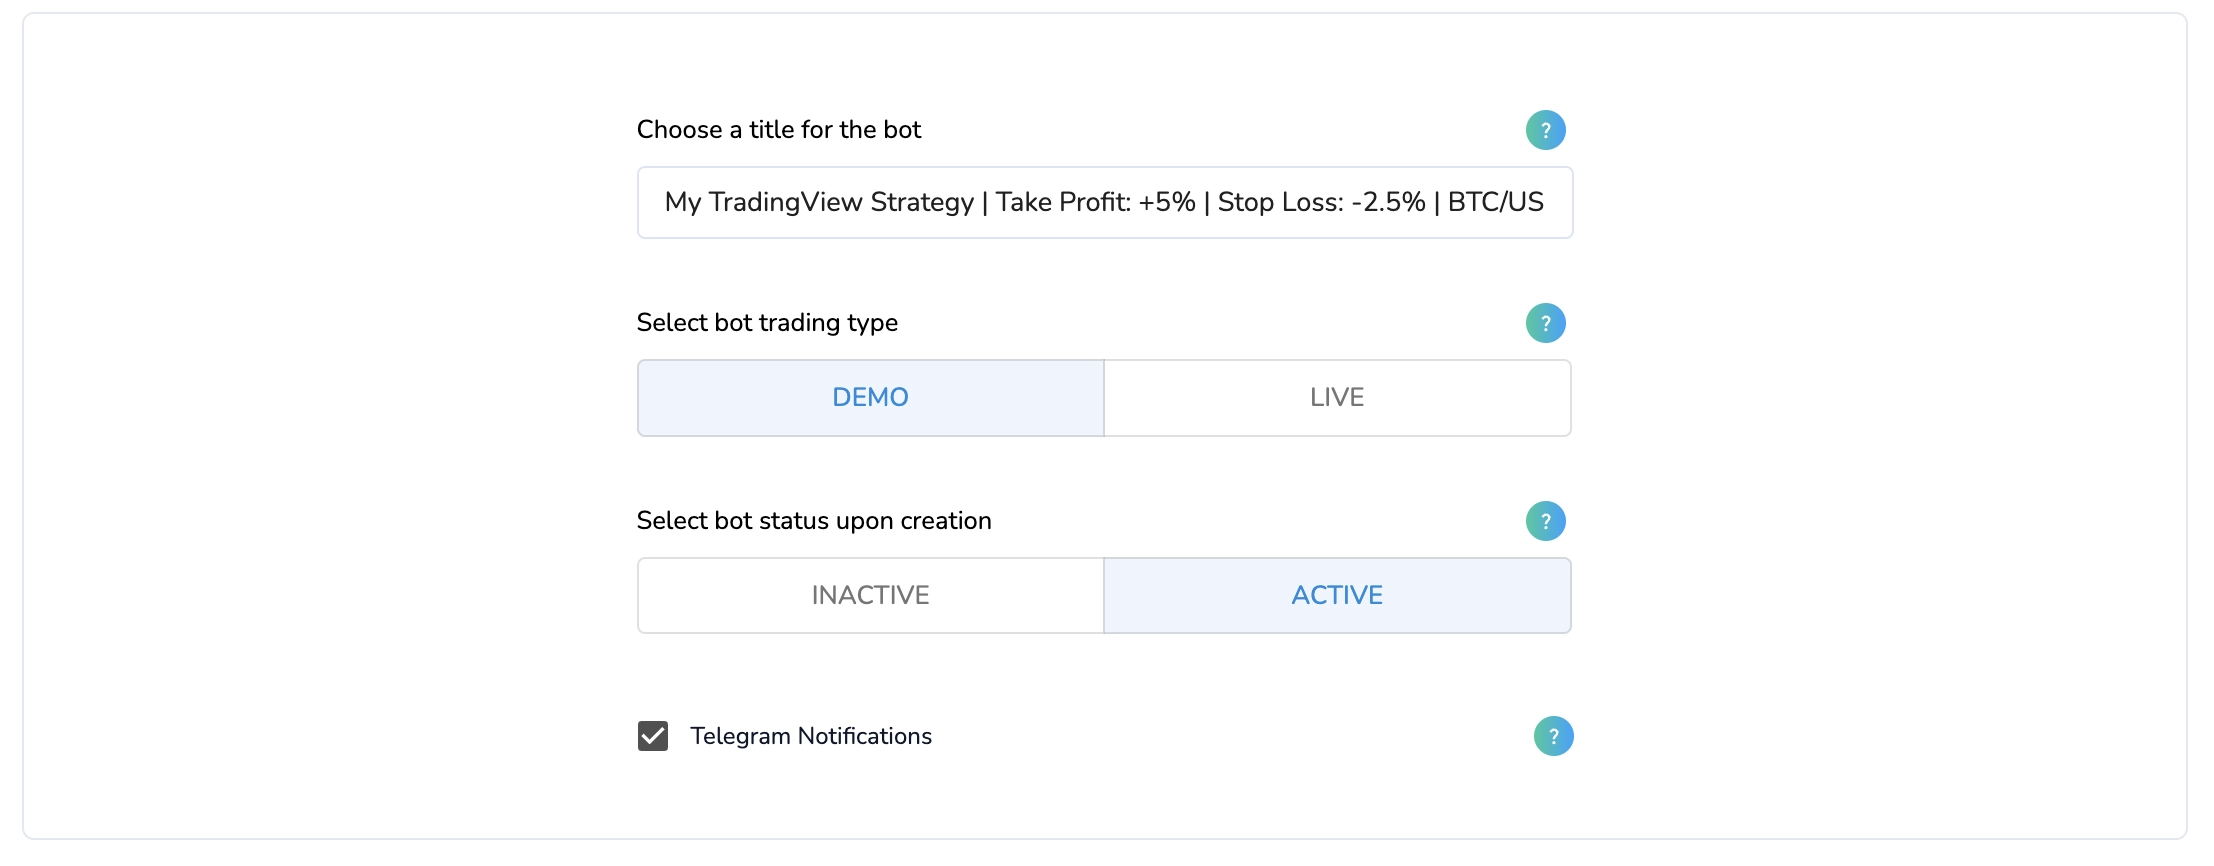
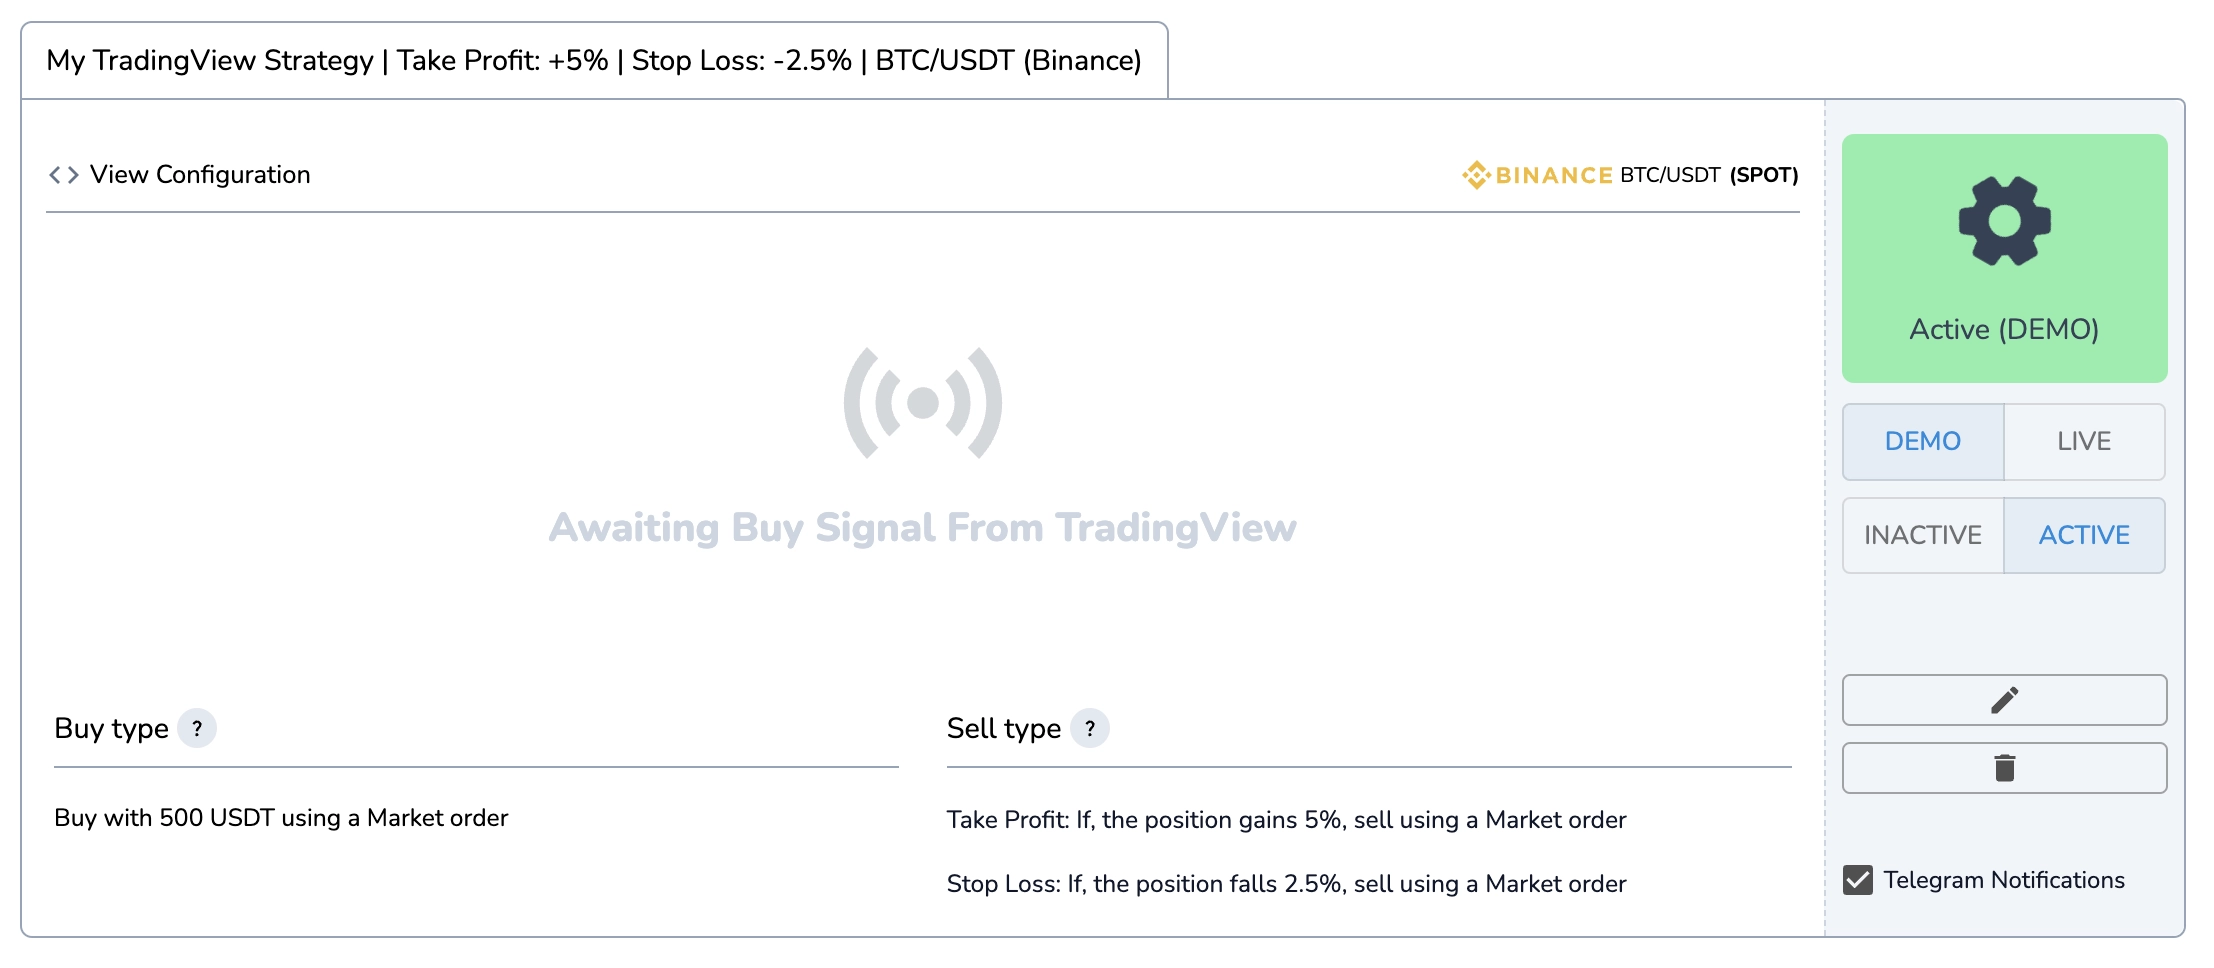
In this final step, you’ll configure the bot’s name, trading mode (Demo or Live), activation status, and optional Telegram notifications. These settings determine how the bot operates and whether it executes real trades or just simulates them.
Choose a Name for Your Bot
Enter a name that helps you easily identify your strategy. A good format is:
✅ "My TradingView Strategy | Take Profit: +5% | Stop Loss: -2.5% | BTC/USDT (Binance)"
This way, you can quickly see what the bot is designed to do.
Select Bot Trading Type: Demo vs. Live
You can run the bot in two different modes, depending on whether you want to test your strategy first or execute real trades.
🔹 Demo Mode (Paper Trading)
- Simulates trades without using real funds.
- Helps you test strategies in real market conditions risk-free.
- Useful for backtesting and fine-tuning before going live.
🔹 Live Mode (Real Trading)
- Uses real funds from your exchange account.
- Executes trades automatically based on TradingView alerts.
- Requires a connected exchange API key for order execution.
💡 If you’re new to automation, it’s highly recommended to start in Demo Mode before switching to Live Mode. You can easily change this setting later if you decide to go live with real funds.
Set Bot Status Upon Creation: Active or Inactive
- Active → The bot starts immediately and listens for TradingView alerts.
- Inactive → The bot is created but won’t execute trades until you manually activate it.
Enable Telegram Notifications (Optional)
Checking this box allows your bot to send real-time alerts to your Telegram account. This is useful for monitoring trades, tracking performance, and receiving important updates directly on your phone or desktop. Before enabling this option, make sure you have already activated Telegram notifications in your account settings.
Once all settings are configured, click on "Save" to finalize the bot creation.
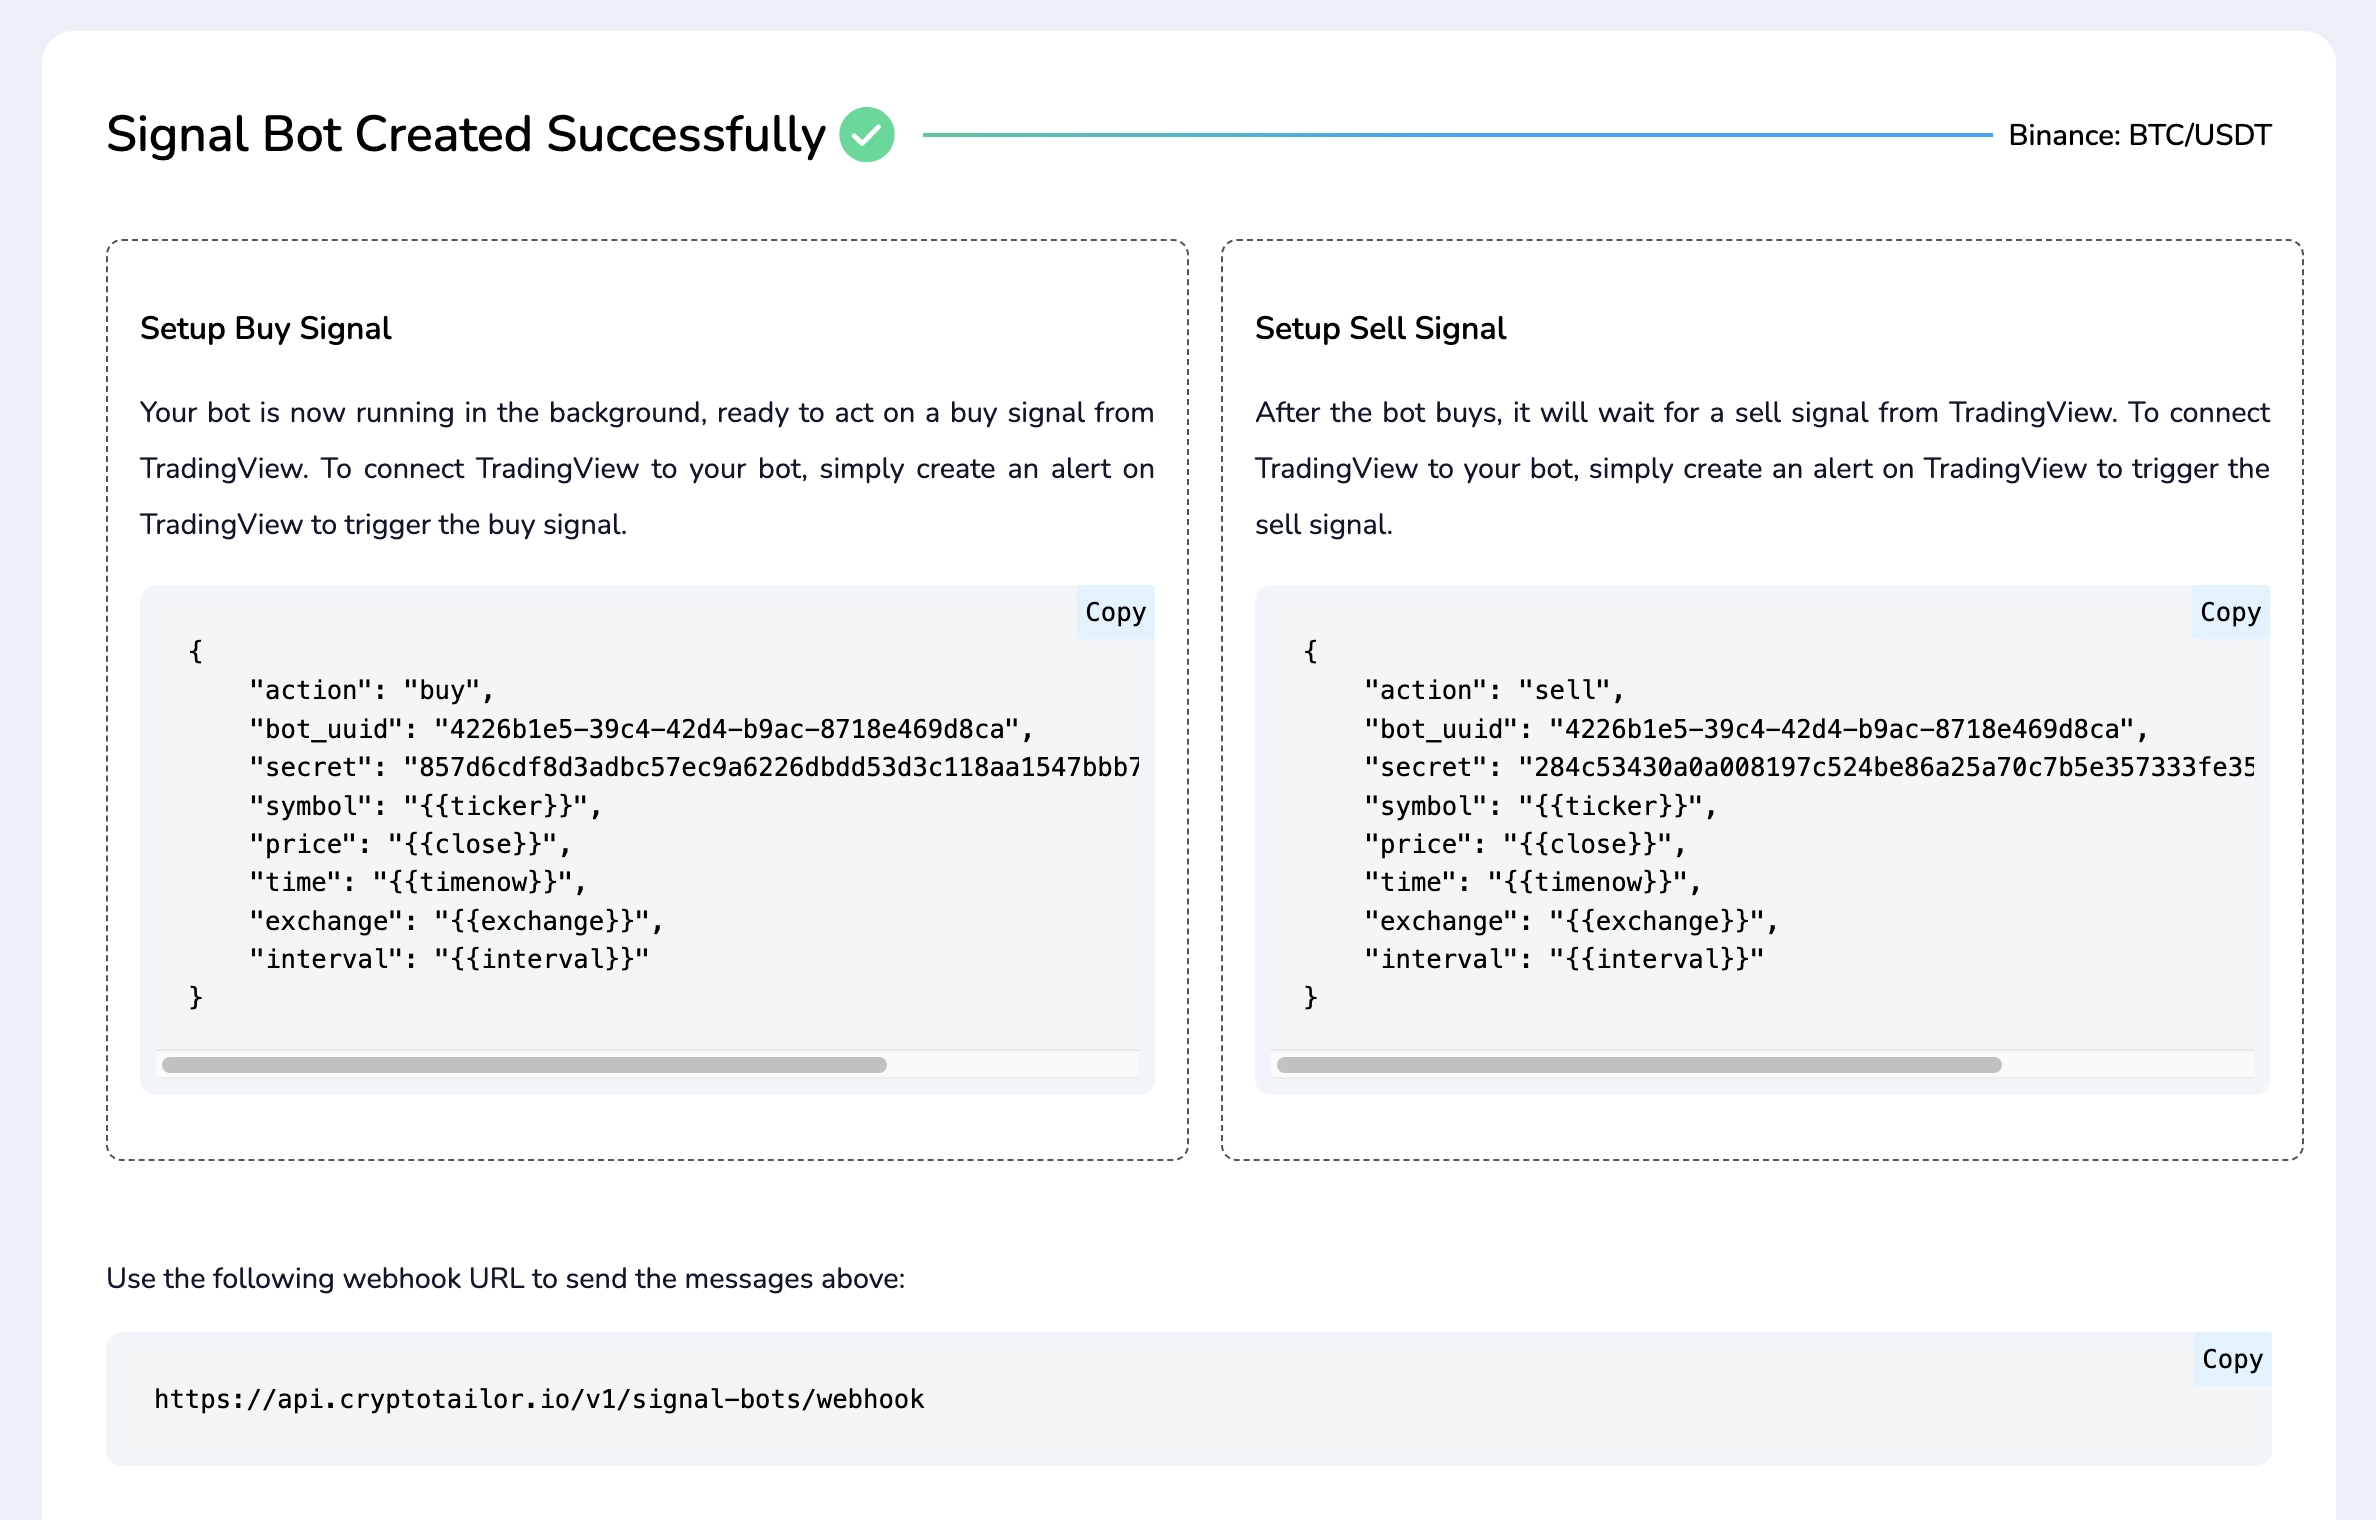
When the bot is created, you will receive:
- ✅ A Buy Message – This is the alert format TradingView will use to trigger a buy order.
- ✅ A Sell Message – This is the alert format TradingView will use to trigger a sell order.
- ✅ Webhook URL – This is the endpoint where TradingView will send the alerts to communicate with your bot.
You’ll need these details when setting up alerts in TradingView. Keep this page open as we proceed to the next step.
In just three simple steps, we’ve successfully created a fully automated TradingView Signal Bot. This bot now runs 24/7 in the background, continuously waiting for buy and sell signals from TradingView, while also managing your risk automatically based on your configured settings.
What Happens Next?
- 🚀 The bot monitors incoming alerts from TradingView.
- 📊 When a buy signal is received, the bot opens a trade on your selected exchange.
- 🔄 The bot then waits for a sell signal to automatically close the position.
- ✅ If take profit or stop loss conditions are met, the bot will exit the trade accordingly.
Now, Let's Connect TradingView to This Bot
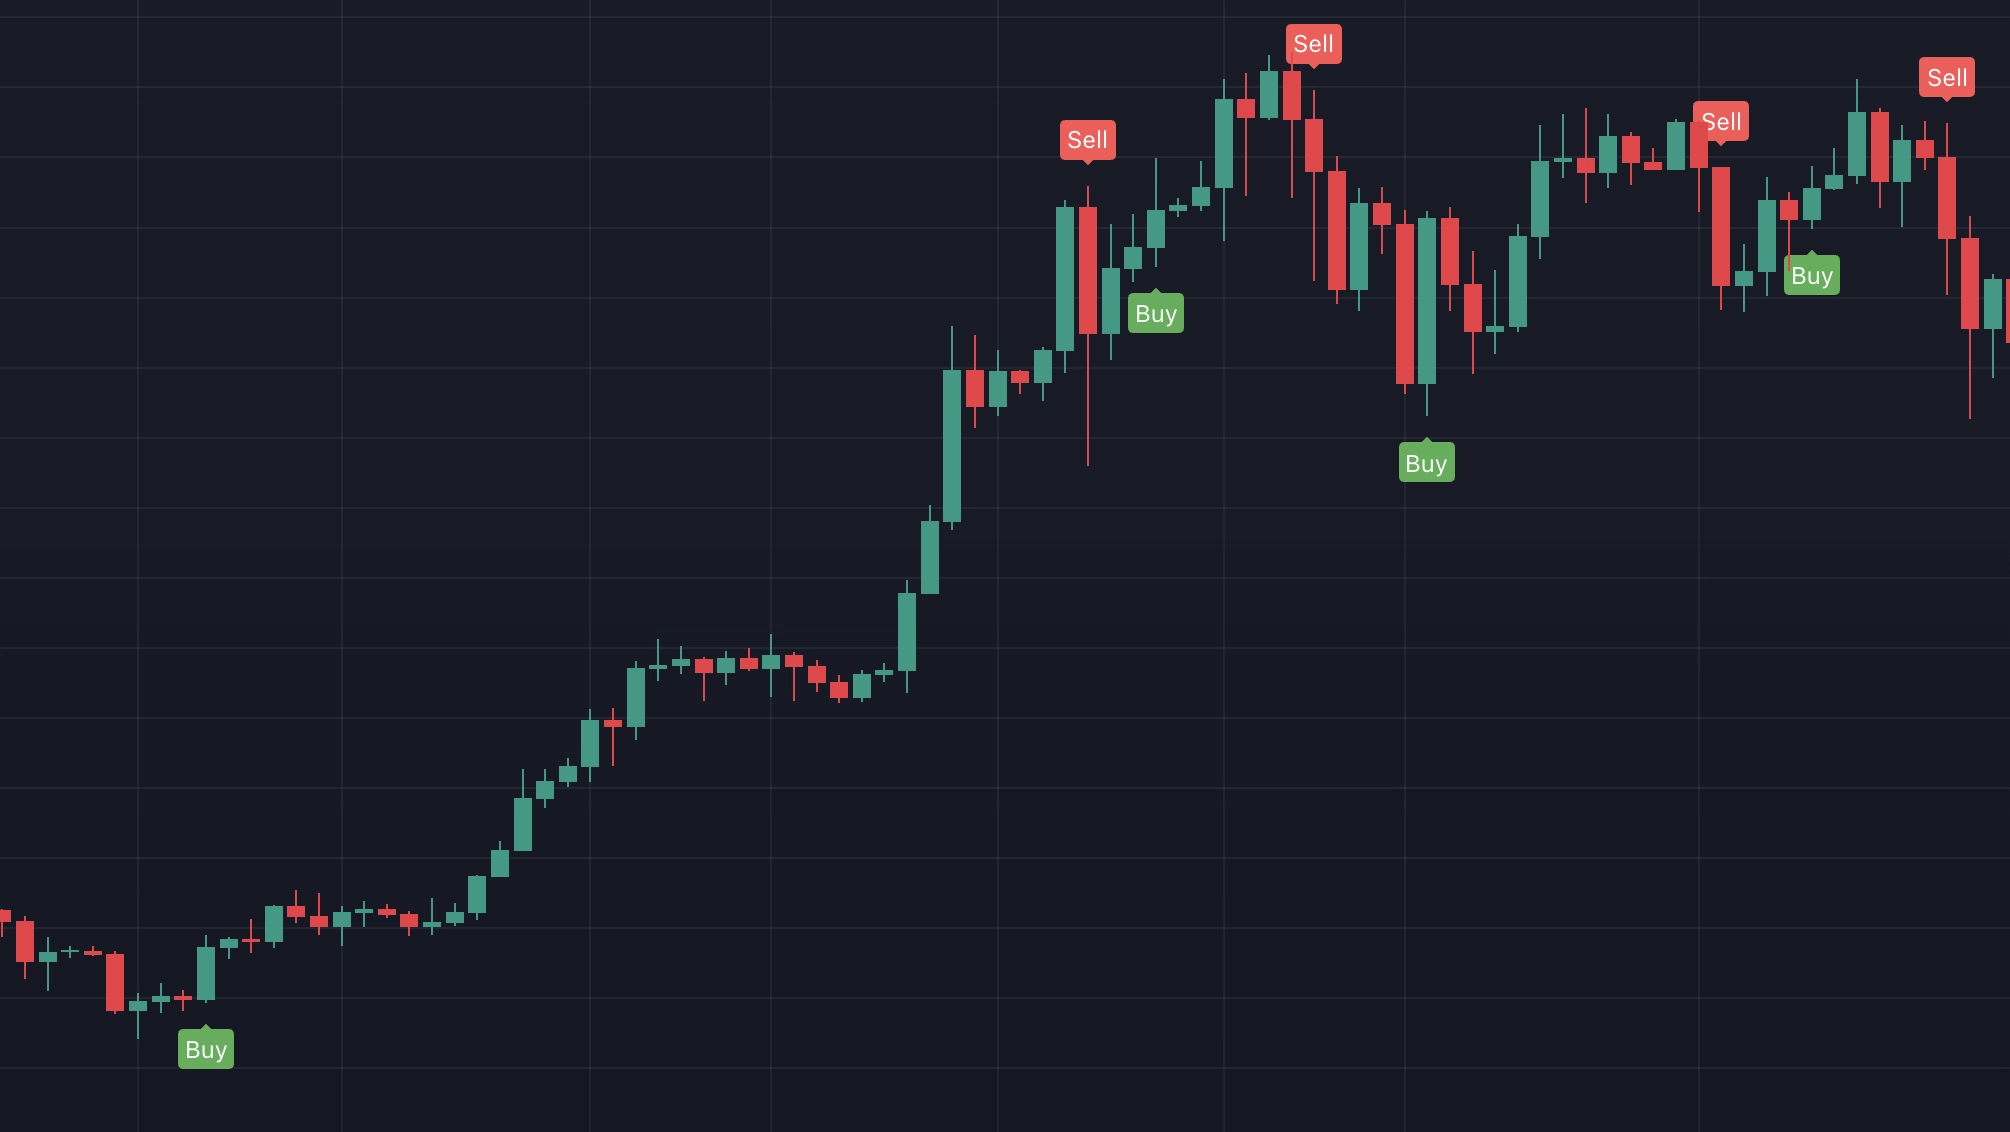
To complete the setup, we need to configure TradingView alerts to send triggers to this bot. For this example, we’ll use "UT Bot Alerts", but you can configure your own Pine Script, strategy, or any indicator to send buy and sell signals to your bot.
Add UT Bot Alerts to Your Chart
- Open TradingView and go to your desired trading pair (e.g., BTC/USDT) and select your desired timeframe (e.g., Daily).
- Click on the Indicators (fx icon) in the top menu.
- In the search bar, type "UT Bot Alerts" and select it.
- The indicator will now appear on your chart, displaying buy and sell signals based on its strategy.
Now that we've added UT Bot Alerts to the chart, we need to set up alerts in TradingView so they send buy and sell signals to the bot. For this, we’ll use the buy and sell messages from the previous step, along with the webhook URL.
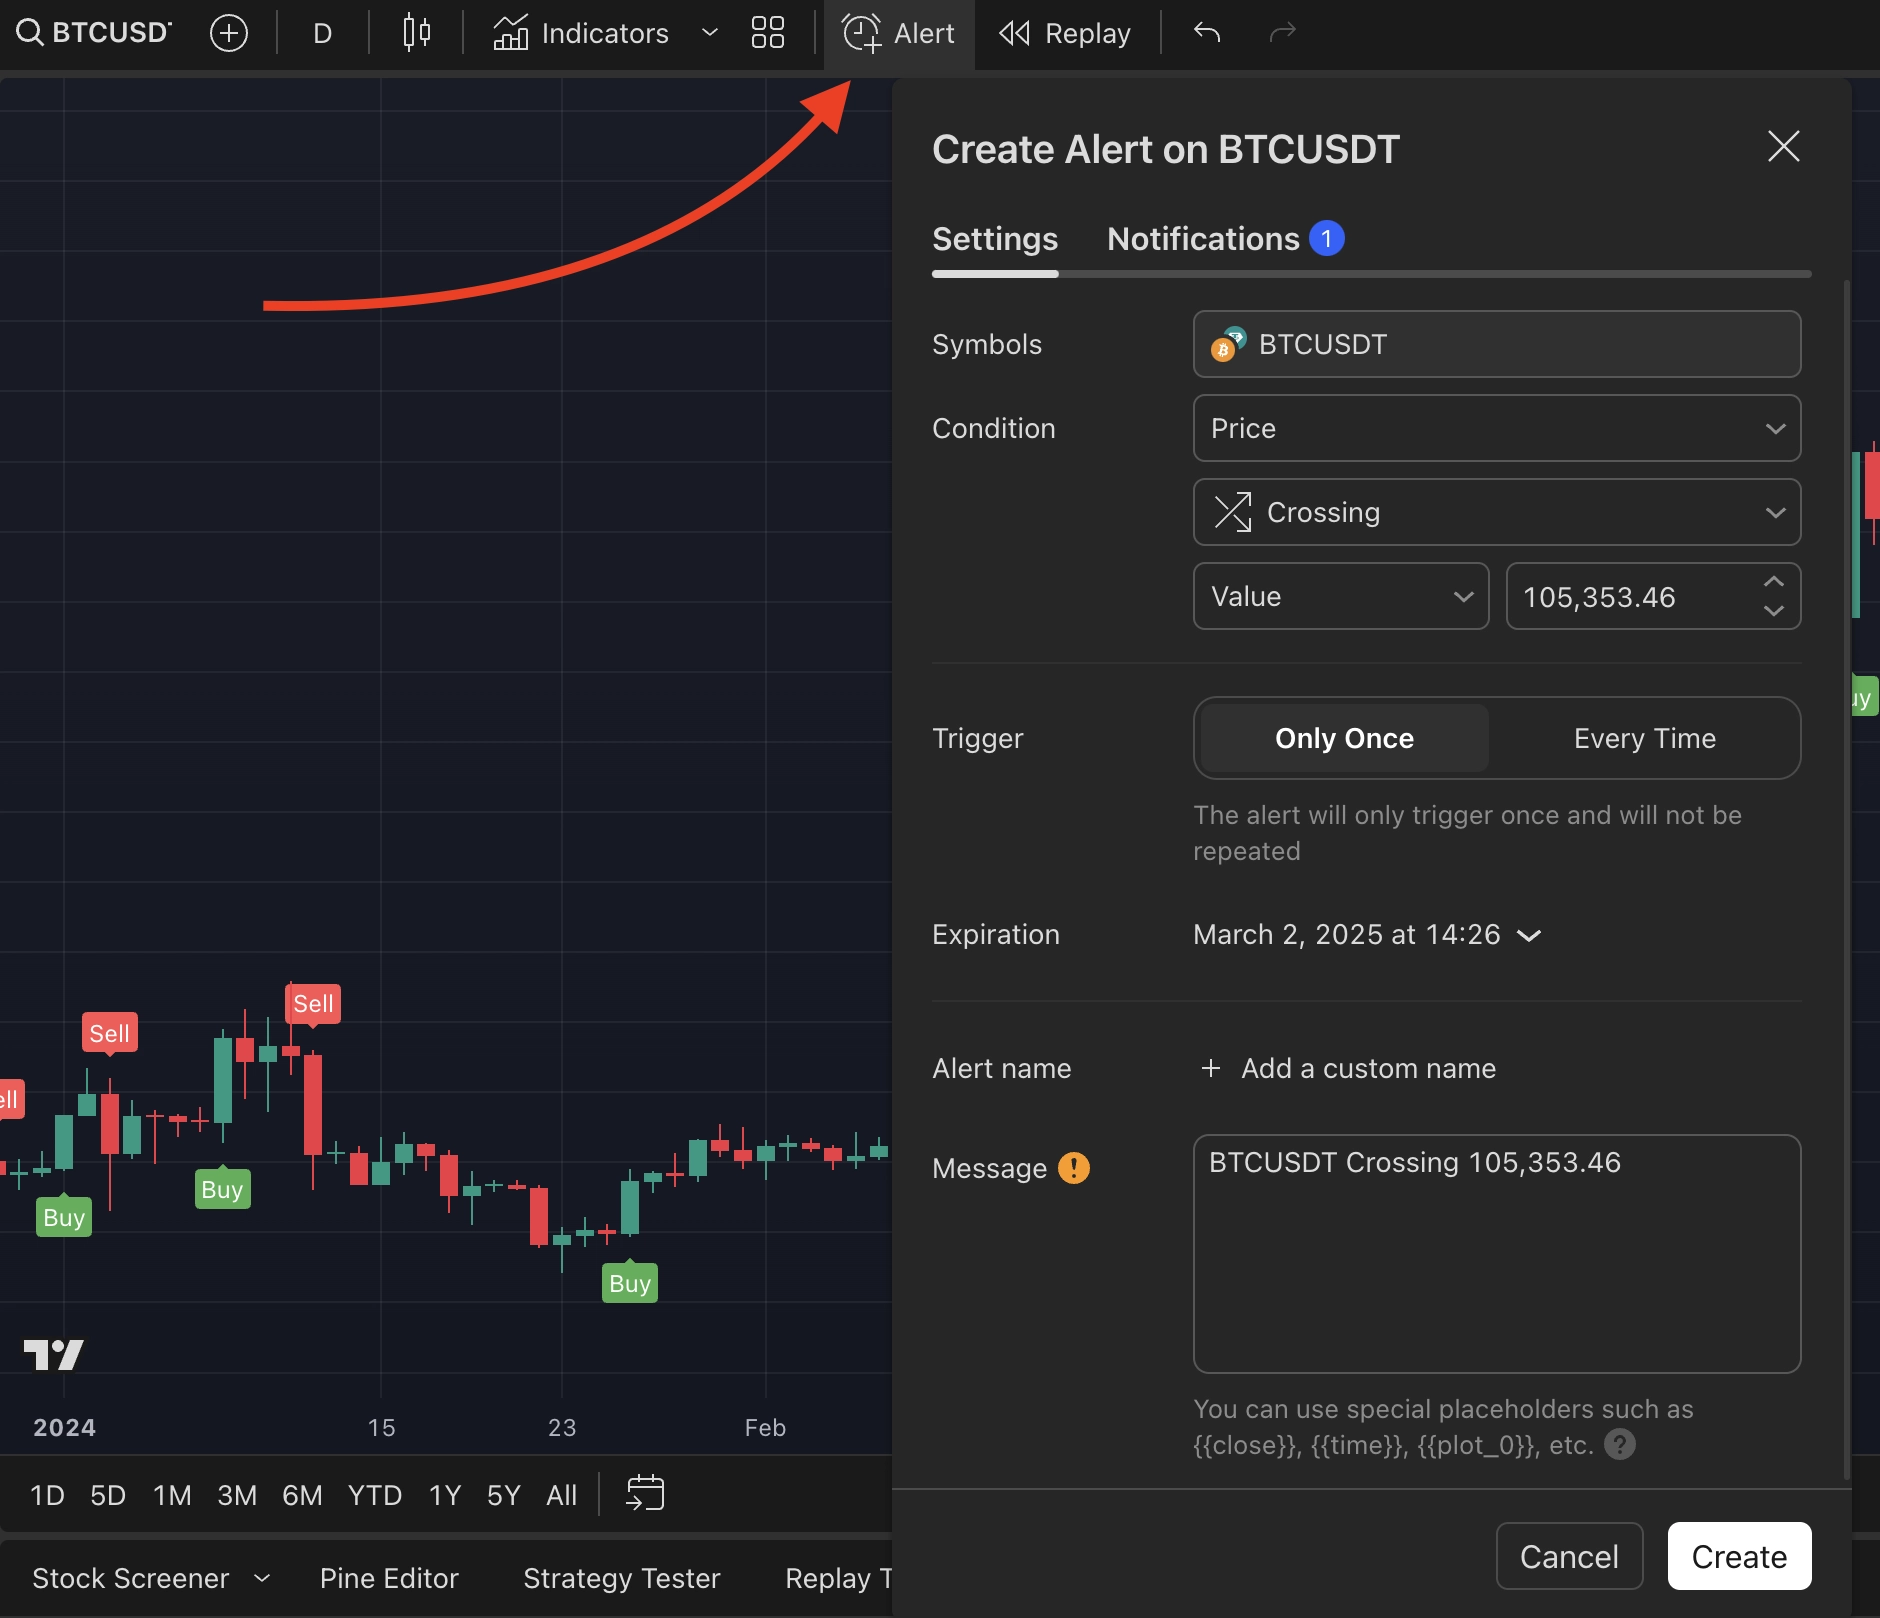
Open the Alert Creation Window
In TradingView, click on the Alerts (⏰ icon) from the top toolbar.
Configure the Buy Alert
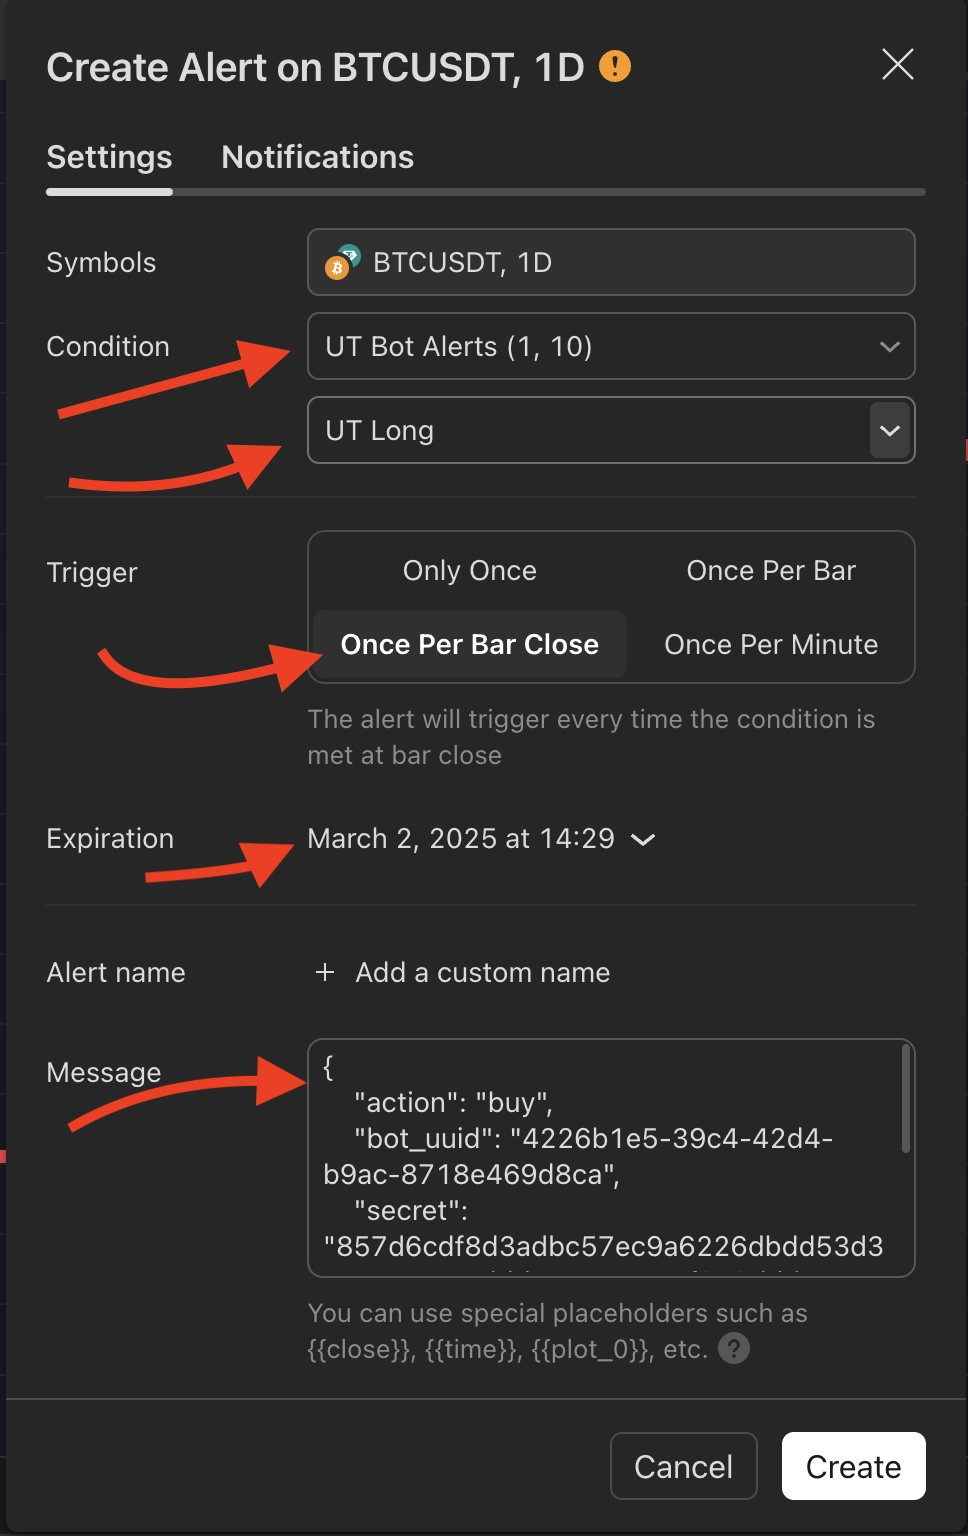
On the "Settings" Tab:
- Symbols → Ensure the correct trading pair is selected (e.g., BTCUSDT, 1D).
- Condition → Select UT Bot Alerts.
- Trigger Type → Choose "UT Long" (for buy signals).
- Trigger Frequency → Select "Once Per Bar Close" (ensures the alert only triggers when the candle closes, reducing false signals).
- Expiration → Choose a preferred expiration date for this alert.
- Message → Copy and paste the buy message from your bot setup.
On the "Notifications" Tab:
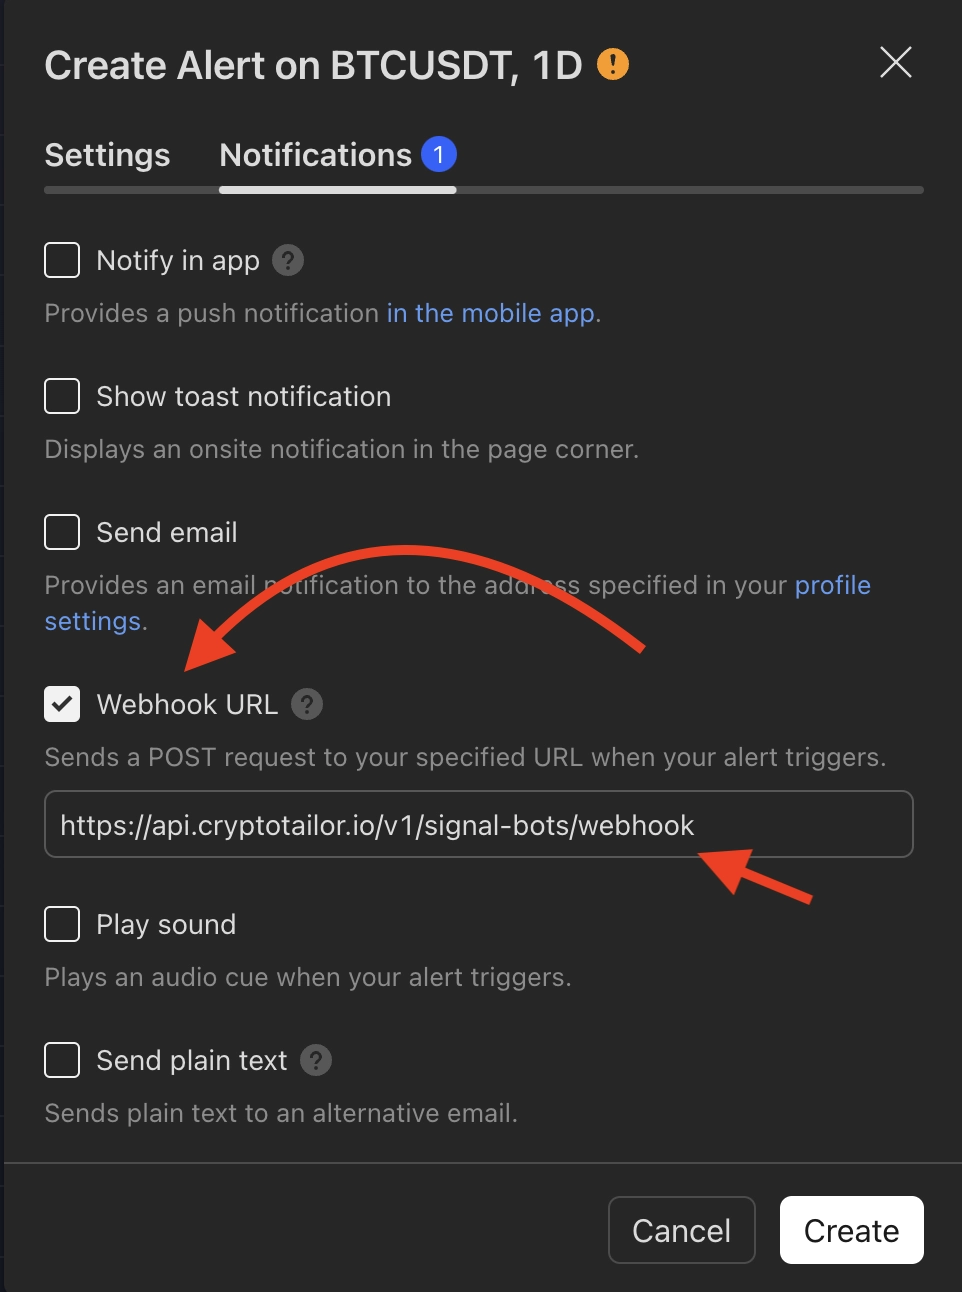
- Webhook URL → Scroll down and enable "Webhook URL", then paste: https://api.cryptotailor.io/v1/signal-bots/webhook
And finally, Click "Create" to save the buy alert.
Configure the Sell Alert
Now, repeat the same steps to create a new alert, but with the following changes:
- Condition → Select UT Bot Alerts and choose "UT Short" (for sell signals).
- Message → Use the sell message from your bot setup.
Once done, click "Create" to finalize the sell alert.
Your bot is now fully connected to TradingView! Whenever UT Bot Alerts detects a buy or sell signal, TradingView will send the alert to your bot via the webhook, and the bot will execute the trade automatically. You can create multiple alerts using different indicators or strategies, depending on your preferred trading conditions.
Next Step: Monitor your bot’s performance and optimize settings for better results! 🚀
How to Monitor Your TradingView Signal Bot
Now that you've successfully set up your TradingView alerts, it's time to check on your bot!
- Go to your CryptoTailor dashboard.
- From the left menu, navigate to TradingView Signal Bots.
As you can see, your bot is actively listening for alerts from TradingView.
- Whenever a buy or sell alert is triggered, the bot will process the signal and execute the trade automatically.
- If you enabled take profit or stop loss, the bot will also handle risk management for you.
After a buy signal is received, the bot will automatically open a new position for you. You can track your active trades by navigating to Positions > Open in the left sidebar menu.
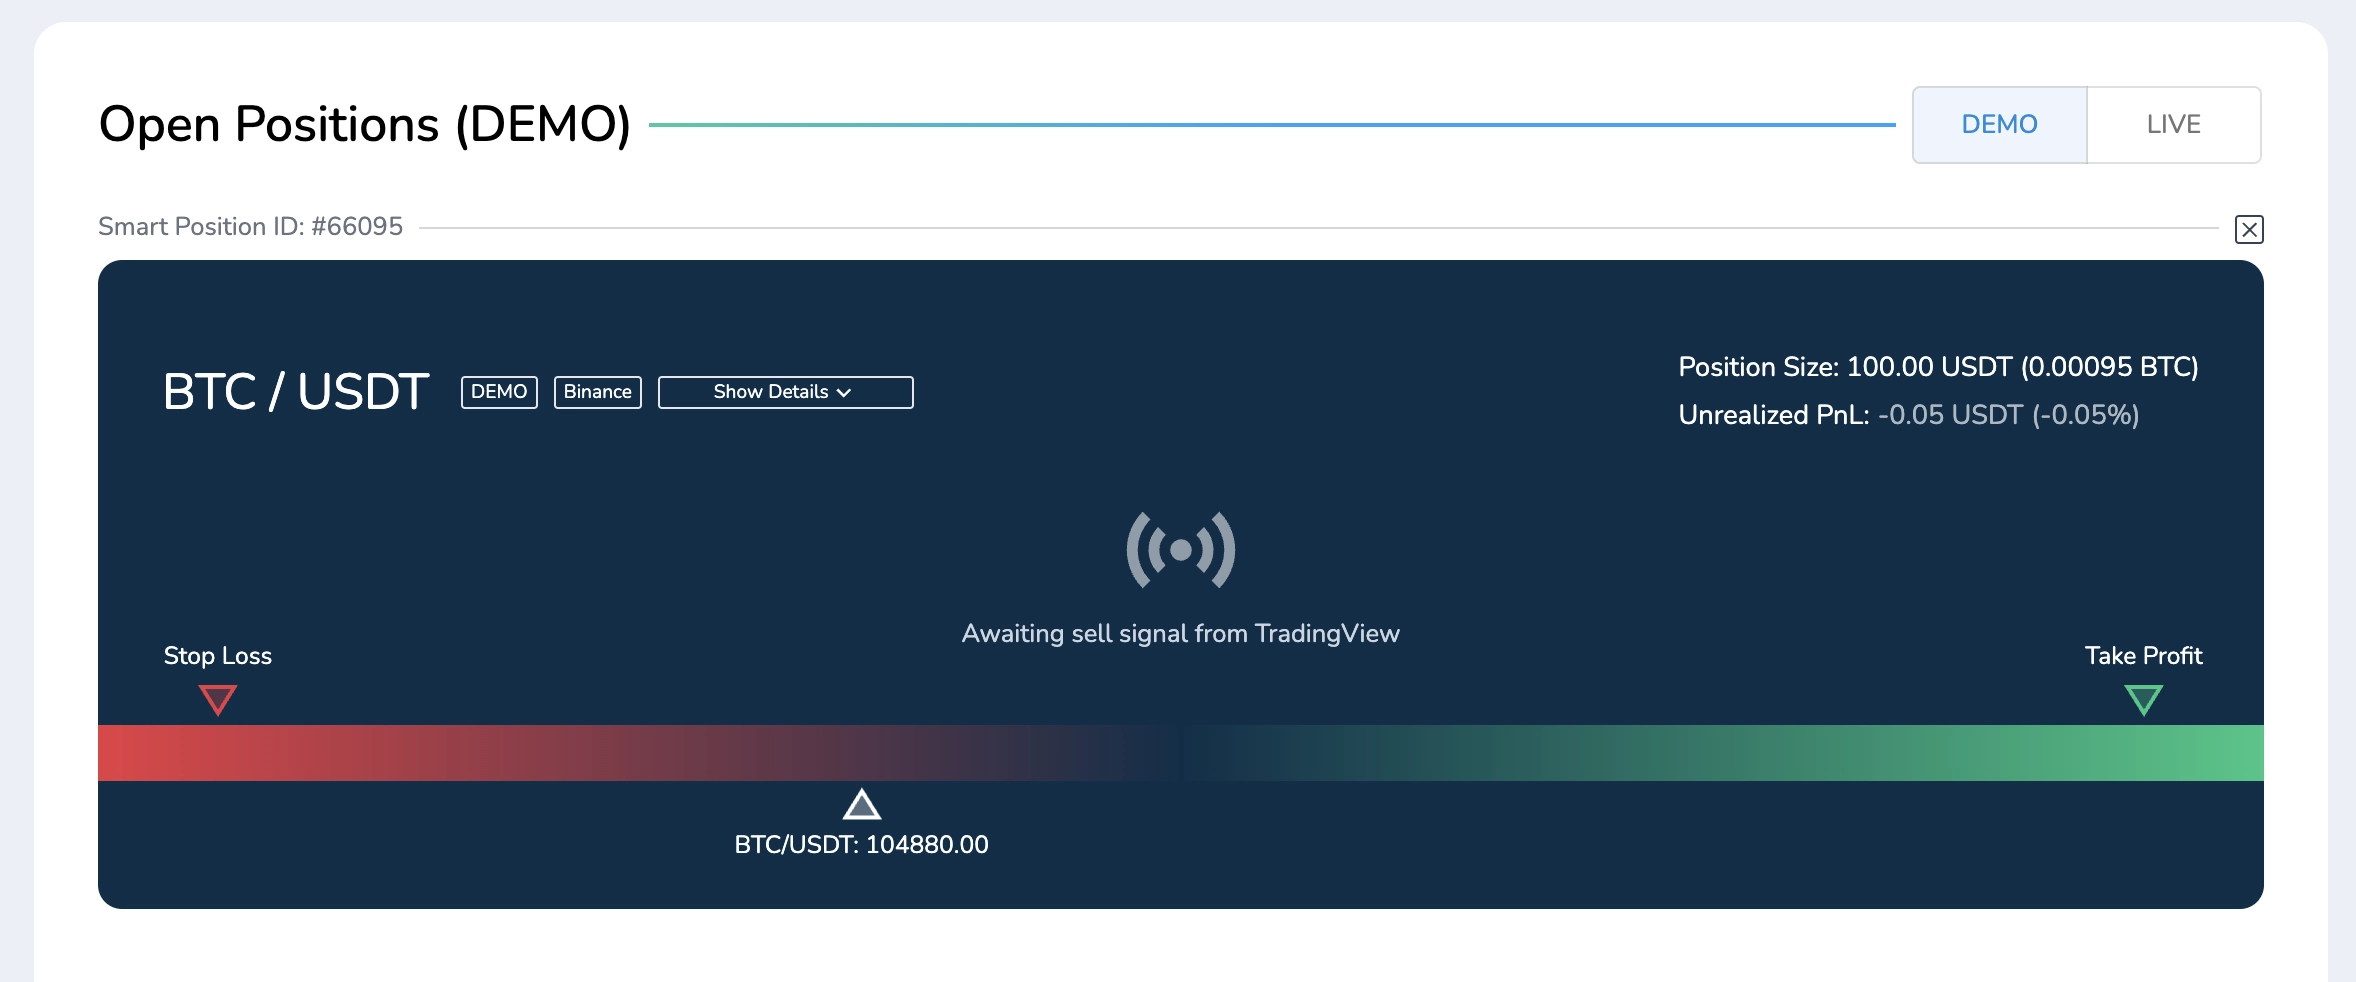
You can see the opened position in the image above, awaiting sell signal from TradingView while also managing risk.
Enabling Live Trading with Real Funds
By default, we activated the bot in Demo Mode to forward-test the strategy without risk. Once you’re confident in your setup, you can easily switch the bot to Live Mode so it trades using real funds in your exchange account.
How to Enable Live Trading
- From the left menu, go to Exchanges and select your preferred exchange.
- You'll need to configure it using an API key to allow the bot to execute trades on your behalf.
- For a step-by-step guide on creating API keys for supported exchanges, visit the Security page, where we provide detailed instructions.
Switch Your Bot to Live Mode
- Once your exchange is connected, navigate to your bot control panel.
- You can now easily switch the bot type from Demo Mode to Live Mode.
- The bot will then start executing trades with real funds based on the TradingView signals it receives.
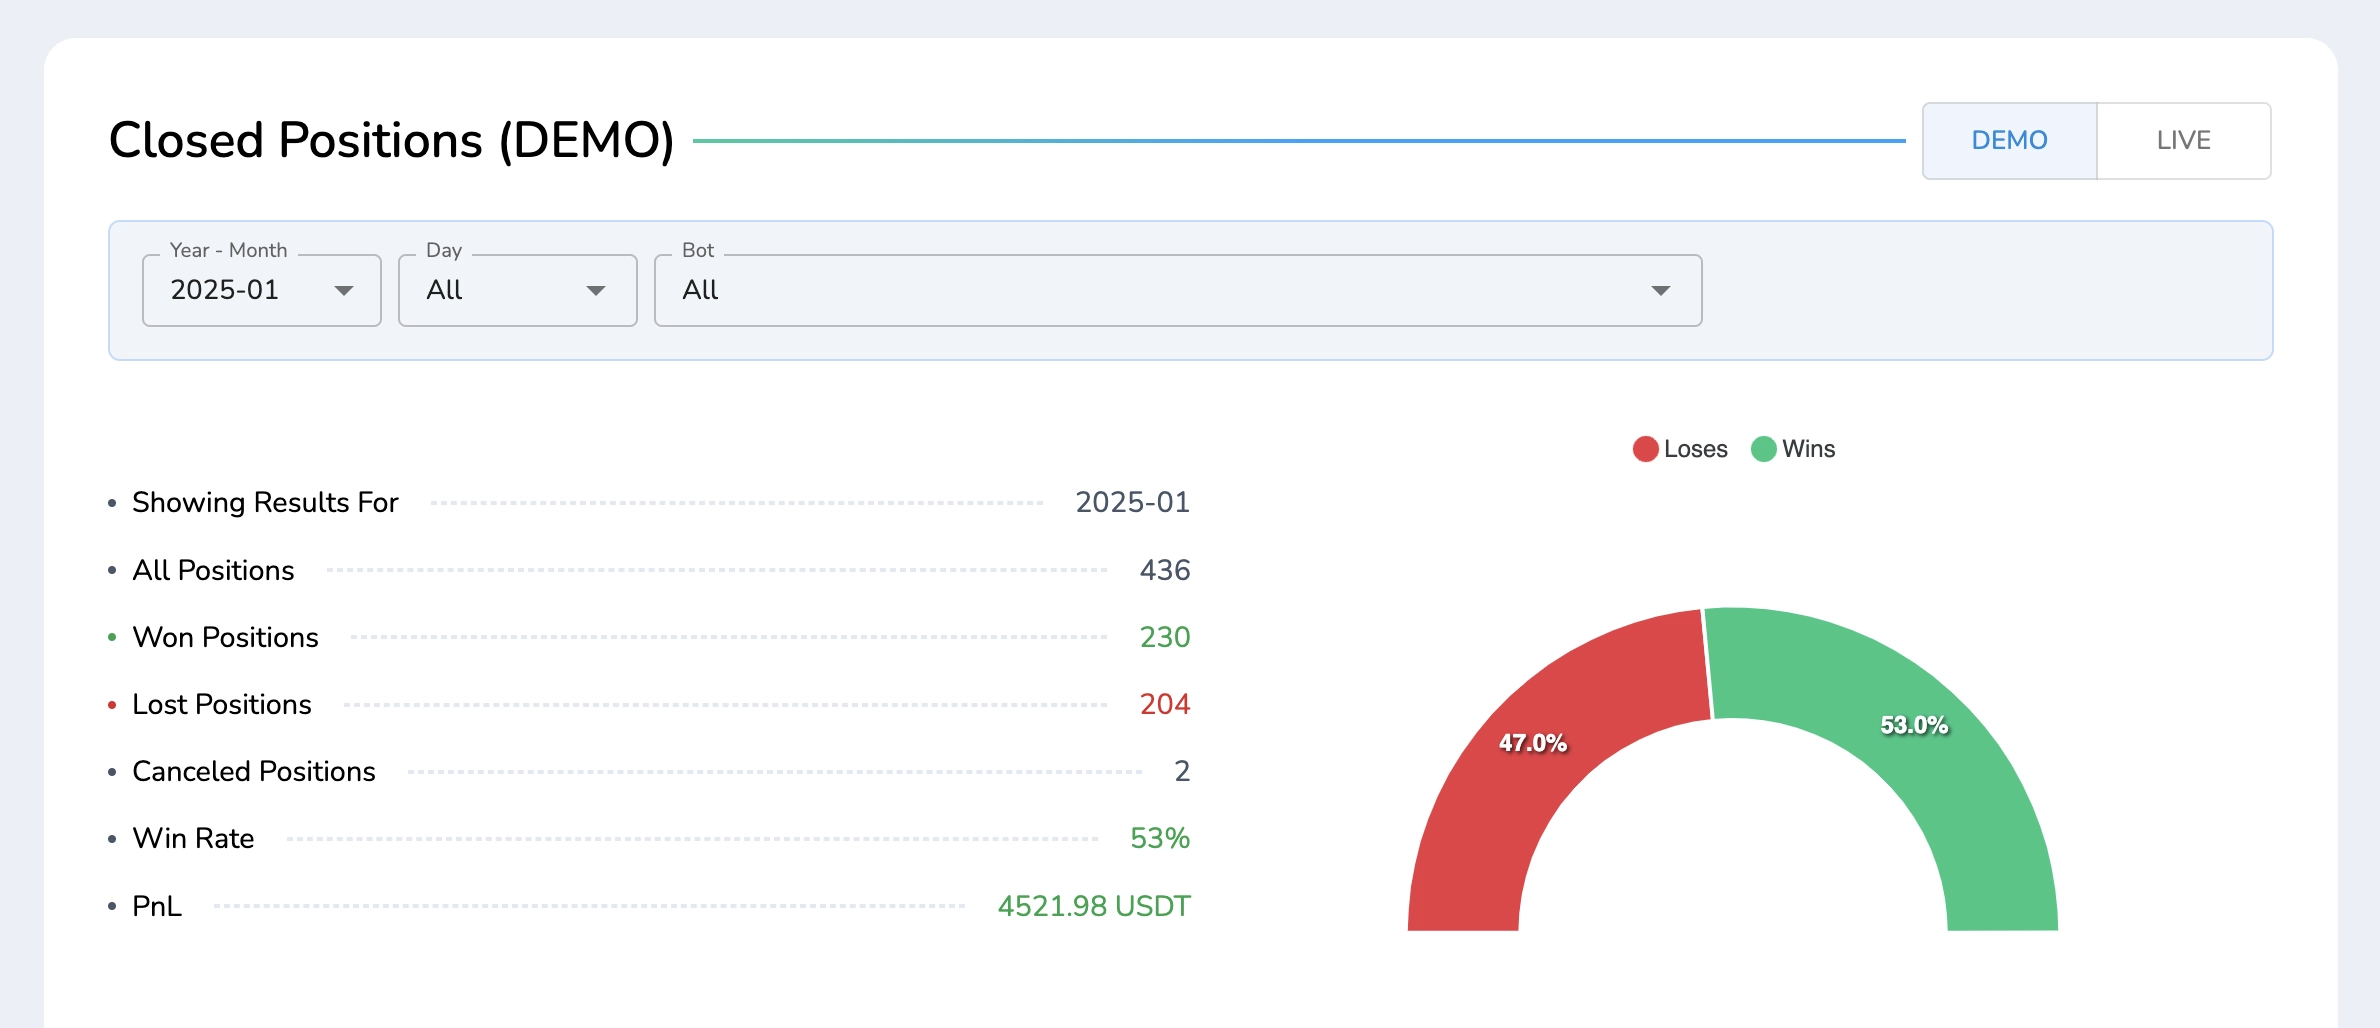
Analyzing Bot Performance with Reports
Understanding how your strategy performs is crucial for optimizing your trades. With CryptoTailor’s reporting, you can easily review all your closed positions and analyze your trading results.
To access your trade history, go to the left sidebar menu and navigate to "Positions > Closed". Here, you'll find a detailed breakdown of all executed trades, including entry and exit points, profit/loss, and other key performance metrics.
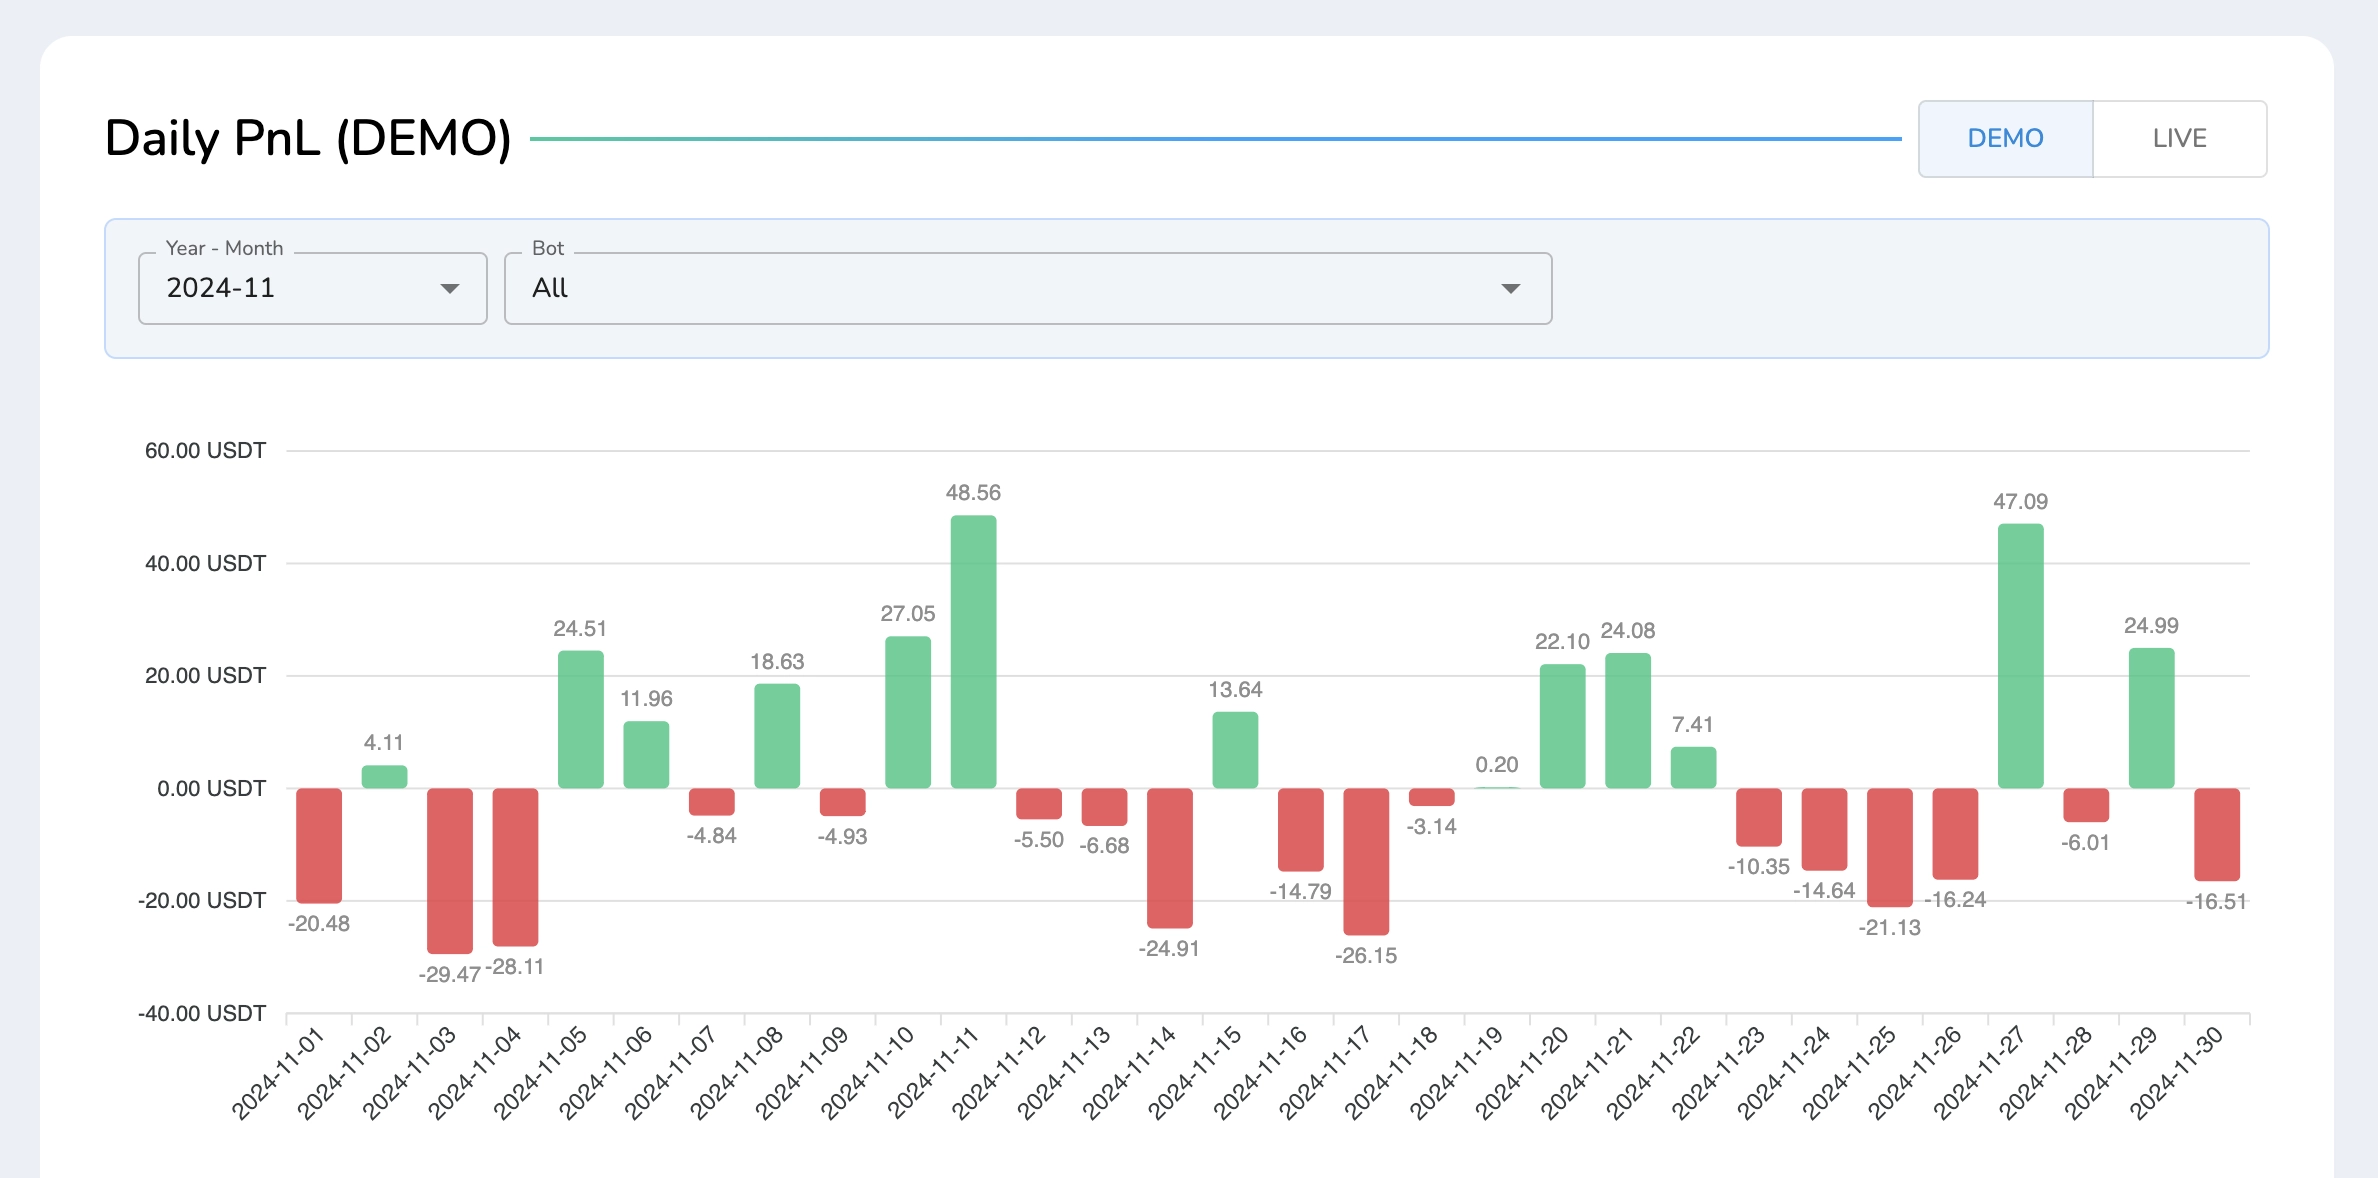
For a Daily PnL chart, navigate to "Reports > Daily PnL" to view a detailed breakdown of your monthly profit and loss trends.
💡 Want to learn more about automating your TradingView signals? Check out our TradingView Signal Bots feature page to explore all the advanced capabilities and benefits.
Automating Any Indicator: Using RSI as an Example
In the example above, we used UT Bot Alerts to demonstrate how TradingView Signal Bots work. However, to showcase how easy it is to automate any indicator, let's take another example—the Relative Strength Index (RSI).
Whether you're using built-in indicators, custom PineScripts, or strategy-based alerts, the setup process remains the same. In the next steps, we'll configure a TradingView alert for RSI to trigger automated trades, just as we did with UT Bot Alerts.
Open TradingView and add the RSI indicator to your chart. Click on "Alert" to create a new alert. In the alert settings window, select RSI instead of UT Bot Alerts as the condition.
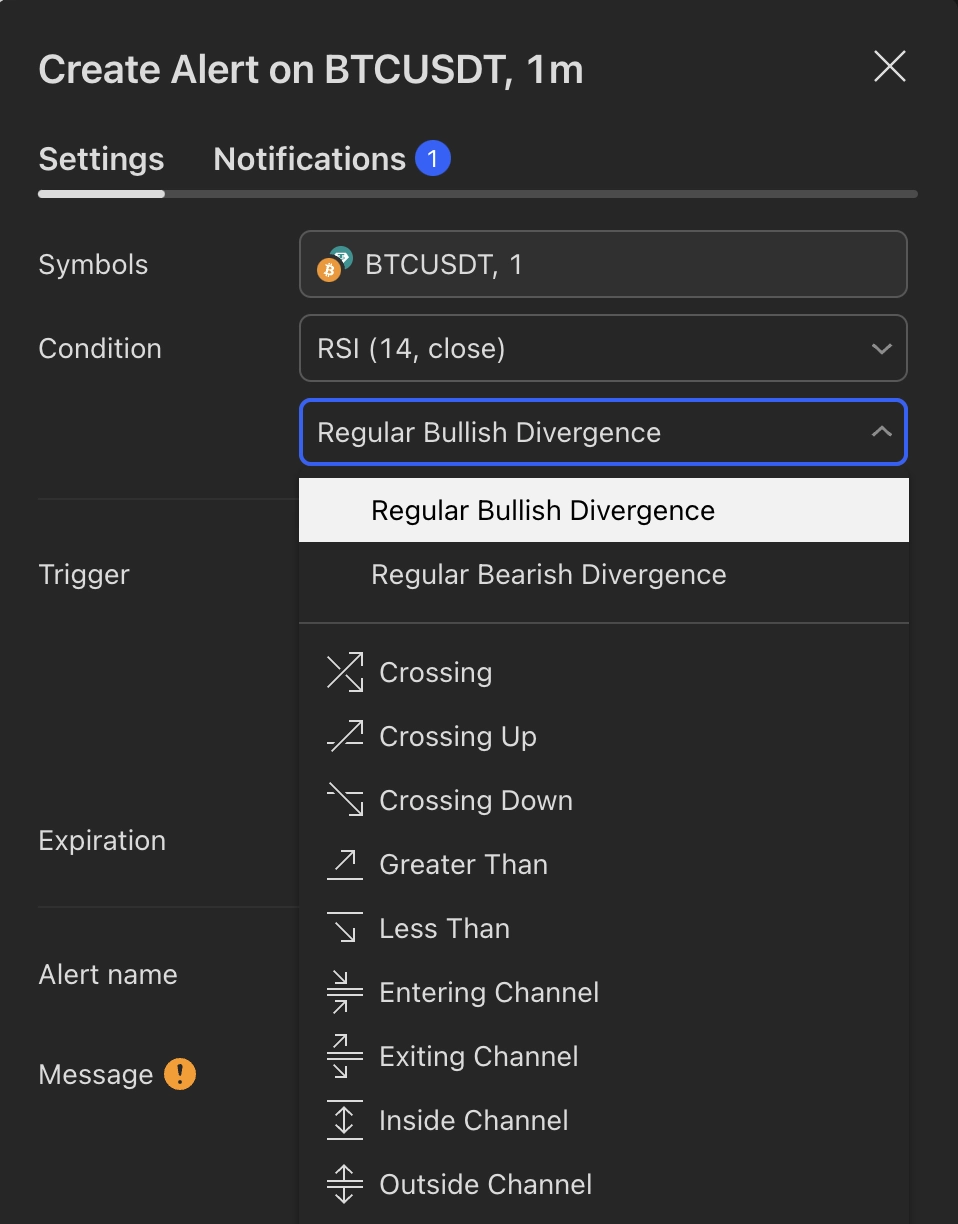
As you can see in the image above, TradingView provides various conditions for setting up alerts using the RSI indicator. You can configure the alert based on your specific trading strategy.
For example:
- Buy Signal → Set the alert to trigger when RSI crosses below 30, indicating an oversold condition.
- Sell Signal → Set the alert to trigger when RSI crosses above 70, indicating an overbought condition
Alternatively, you can use divergences, channel breakouts, or custom levels to create more advanced alerts.
Once you've configured your RSI alert, simply paste the correct buy or sell message (as we did earlier) and set the Webhook URL to connect it with your bot.
Need help setting up your alerts? We're always here to assist! If you have any questions or need guidance, feel free to reach out to our support team—we're happy to help you automate your trading with ease. 🚀